Connect Your AI Assistant to Kommo
liviu
Author
A Step-by-Step Guide
Your AI assistant is ready to handle customer conversations – but what if those conversations are happening inside your CRM? With the Kommo integration, your assistant can read and respond to messages directly within Kommo’s chat interface, so your team never has to leave the tool they already use every day.
In this guide, we’ll walk you through the entire setup process, from connecting your Kommo account to fine-tuning which channels your assistant responds on. It takes about five minutes.
What You’ll Need Before You Start
Before diving in, make sure you have the following:
- A Fineguide account with at least one AI assistant already created. If you haven’t built your first assistant yet, head to the AI Agents section and create one – it only takes a couple of minutes.
- A Kommo account with admin-level access. You’ll need permission to authorize third-party applications, since the integration uses OAuth to securely connect the two platforms.
- Allow popups for your Fineguide dashboard. The authorization step opens a popup window, so make sure your browser isn’t blocking it.
That’s it. No API keys to copy, no webhooks to configure manually – the integration handles all of that for you.
1. Open the Connect Apps Page
Start by navigating to the assistant you want to connect. From your Fineguide dashboard, go to AI Agents, then click on the assistant you’d like to integrate with Kommo.
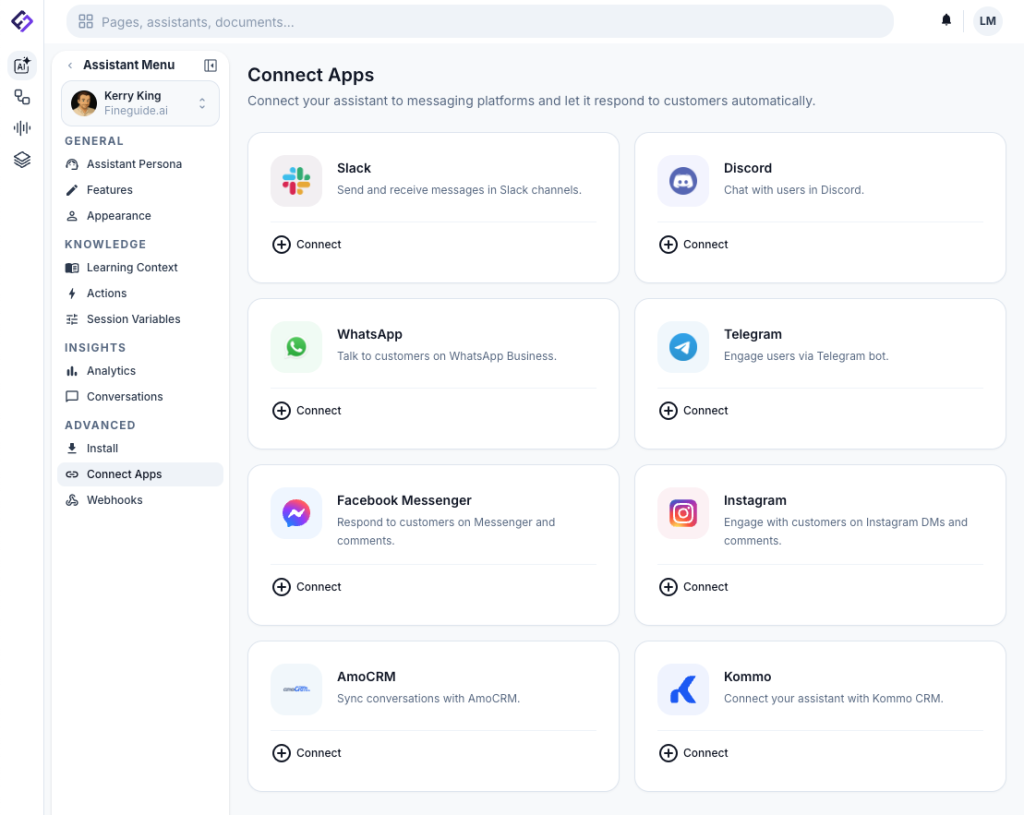
Once you’re inside the assistant’s settings, look at the sidebar on the left. Click on Apps – this is where all your integration options live.
You’ll see a grid of available platforms: Telegram, WhatsApp, Slack, Discord, and others. Find the Kommo card and click on it.
2. Authorize Your Kommo Account
After clicking the Kommo card, you’ll see a brief description of what the integration does: syncing conversations and letting your assistant respond through CRM channels. Below that, there’s a “Connect Kommo” button.
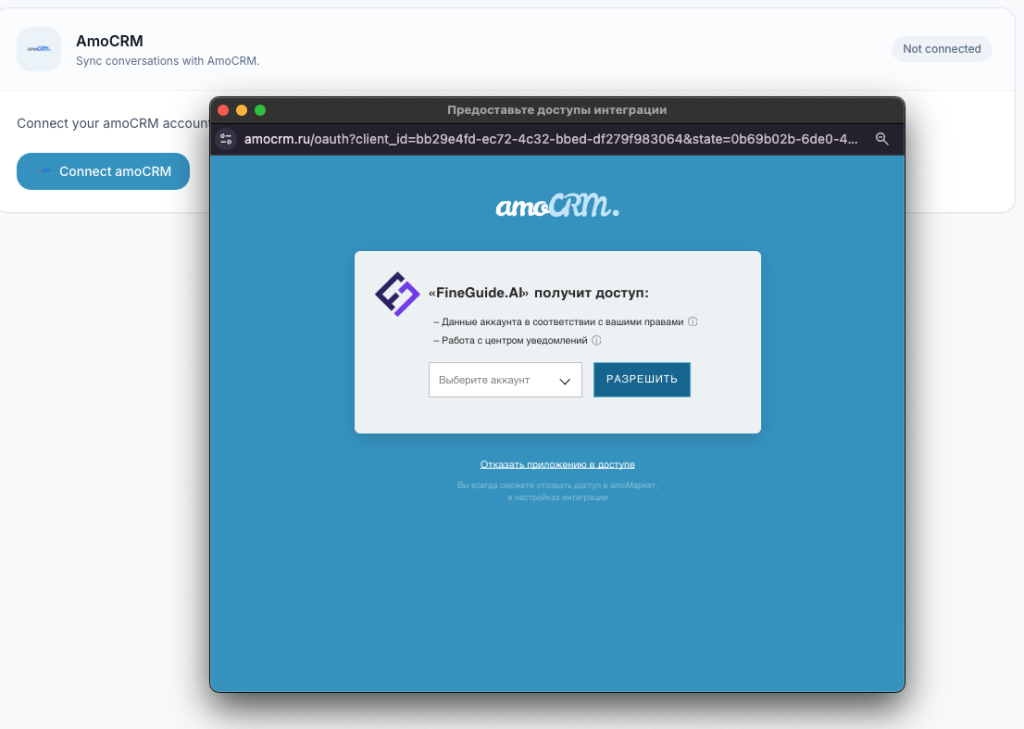
Click it. A popup window will open, taking you to Kommo’s authorization page. If you’re already logged into Kommo, you’ll see a permission request screen. If not, you’ll need to log in first.
Kommo will ask you to grant FineGuide access to your account. Review the permissions and click Allow (or the equivalent confirmation button in your language).
Once you approve, the popup will close automatically and you’ll be back on the FineGuide dashboard. A success notification will confirm that your Kommo account is now connected.
Troubleshooting: If the popup doesn’t appear, check your browser’s popup blocker settings. If you see an error after authorizing, try disconnecting and reconnecting — the OAuth token may have expired during the process.
3. Set Up the AI User
Now that your account is connected, you’ll see a Channel Permissions section in the Kommo panel. Initially, only the Fineguide channel will appear in the list. Click reload button if no channels are listed. To see the full list of your Kommo channels – WhatsApp, Instagram, Facebook, website chat, and any others – you need to provide a Kommo user account.
In the AI User section, enter the following:
- Email — the email address of a Kommo user account.
- Password — the password for that account.
Click Save. You’ll see a “Configured” badge appear, and the channel list will update to show all your connected Kommo channels.

Now you can go back to Channel Permissions and toggle on the channels where you want your assistant to be active. Click Save Changes when you’re done.
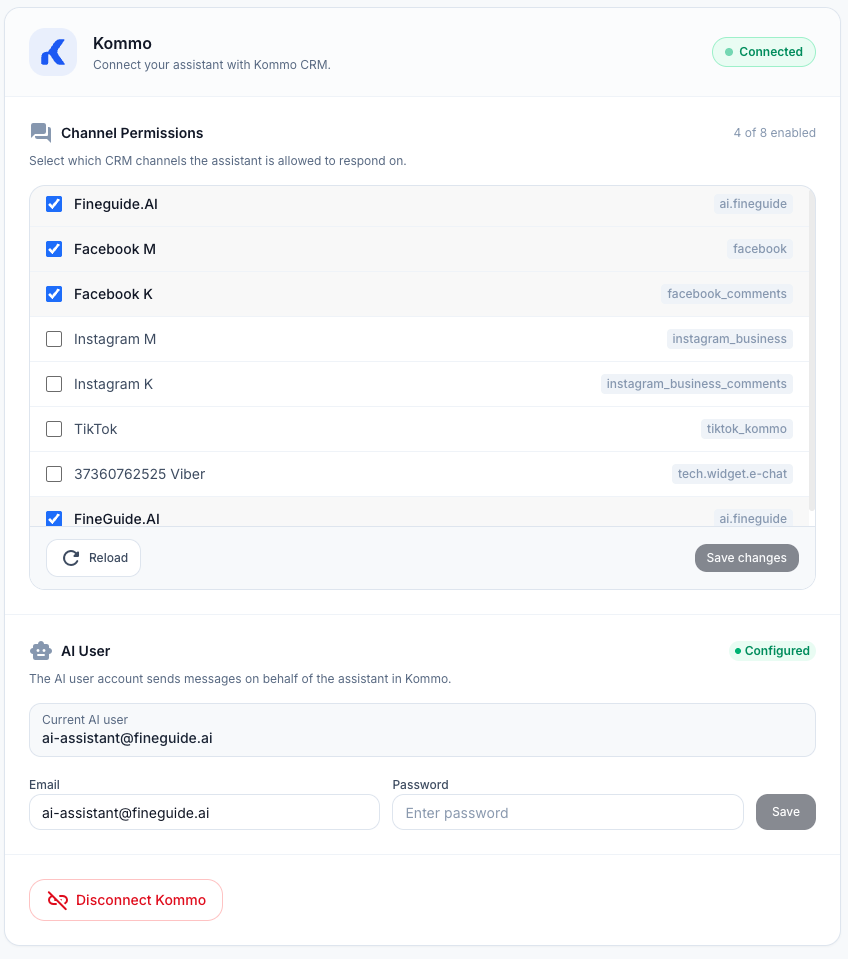
What account should you use? We recommend creating a dedicated Kommo user for your assistant (something like [email protected]). This keeps things clean – your team can easily tell which messages came from the AI versus human agents, and you’re not sharing your personal login.
Is my password stored? No. Your credentials are only used once to generate an authentication token. Fineguide stores only this token. If you ever change the password on the Kommo side, you’ll simply need to re-enter the new credentials to generate a fresh token.
Tip: If you’ve recently added new chat sources in Kommo and don’t see them in the channel list, click the Reload button to refresh.
Troubleshooting: If the popup doesn’t appear, check your browser’s popup blocker settings. If you see an error after authorizing, try disconnecting and reconnecting – the OAuth token may have expired during the process.
4: Test the Connection
With everything configured, it’s time to make sure it works. Here’s a quick way to test:
- Open your Kommo account and navigate to any active conversation, or start a new one through a connected channel.
- Send a test message ь something your assistant is trained to answer.
- If the channel is enabled in your FineGuide permissions, the assistant should pick up the message and respond within a few seconds.
You should see the AI’s reply appear in the Kommo conversation thread, attributed to the AI user you configured in Step 3.
AI-to-Human Handoff: Escalation to Your Team
Sometimes a conversation needs a real person. Maybe the customer has a complex issue, or they simply prefer speaking with a human. Fineguide handles this gracefully through a feature called Human Escalation.
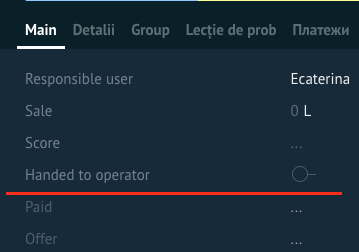
When Fineguide connects to your Kommo account, it automatically adds a custom checkbox field called “Handed to Operator” to every lead. When this checkbox is turned on for a lead, the AI assistant stops responding to that conversation entirely – your team takes it from there.
How does escalation get triggered?
There are three ways a conversation can be escalated:
A human agent replies. This is the most common scenario. If someone on your team sends a message to the lead from Kommo, the escalation is triggered automatically. The moment your agent types a reply, Fineguide recognizes that a human is taking over and steps aside. No buttons to click, no settings to change – it just works.
Manually, via the checkbox. You can also escalate a conversation at any time by opening the lead in Kommo and checking the “Handed to Operator“ box. This is useful when you want to preemptively take over a lead before the next message comes in – for example, if you see a VIP customer in your pipeline and want to handle them personally.
The AI escalates itself. If a customer explicitly asks to speak with a human – saying something like “I want to talk to a real person” or “can I speak to someone?” – the AI recognizes this intent and automatically escalates the conversation. It will let the customer know that a team member will be with them shortly, and then stop responding.
Resuming AI responses
To hand the conversation back to the AI, simply uncheck the “Handed to Operator“ checkbox on the lead. The assistant will pick up the next incoming message as usual.
What Happens Behind the Scenes
Once connected, here’s what the integration actually does:
- Conversations sync automatically. When a customer sends a message through any enabled channel in Kommo, the assistant receives it, processes it, and sends a reply – all within the CRM’s native chat interface.
- Sessions are tied to leads. Each conversation maps to a Kommo lead, so you have full context: the assistant knows which lead it’s talking to and can reference previous interactions.
- Human handoff works seamlessly. The “Human Escalated” checkbox on each lead gives your team full control over when the AI responds and when a human takes over (see the section above for details).
- Channel filtering keeps things tidy. The assistant only responds on the channels you’ve enabled, so there’s no risk of it jumping into conversations it shouldn’t.
- Full channel access. Once you’ve provided a Kommo user account, the assistant can operate across all your connected channels – WhatsApp, Instagram, Facebook, and everything else.
Disconnecting the Integration
If you ever need to remove the connection, go back to the Apps page for your assistant, click on the Kommo integration, and scroll down to the Disconnect Kommo button. You’ll be asked to confirm – once you do, the integration is removed and the assistant will stop responding in Kommo.
You can always reconnect later by going through the same steps above.
Quick Reference
- Go to AI Agents → [Your Assistant] → Connect Apps
- Click Kommo → Connect Kommo, authorize in the popup
- Set up an AI User, then choose which channels the assistant responds on
- Send a test message in Kommo to verify
Frequently Asked Questions
Can I connect multiple assistants to the same Kommo account? Yes. Each assistant connects independently, so you can have different assistants handling different channels or use cases within the same CRM account.
I’m using AmoCRM, not Kommo – does this still work? Absolutely. Kommo is the international rebrand of AmoCRM. If your account is still on AmoCRM (common in Russian-speaking markets), you’ll find a separate AmoCRM card on the Connect Apps page. The setup process is identical.
Does the assistant respond to all messages or only new ones? The assistant only responds to new incoming messages on enabled channels. It won’t retroactively reply to old conversations.
Do I need to configure webhooks manually? No. The integration sets up all necessary webhooks automatically during the OAuth connection process. You don’t need to touch any webhook settings in Kommo.
Is my Kommo password stored on Fineguide’s servers? No. When you enter your credentials in the AI User step, they are used once to generate an authentication token. Only this token is stored – your password is never saved. If you change your Kommo password, just re-enter the new one to generate a fresh token.
Why can I only see the Fineguide channel after connecting? To see all your Kommo channels, you need to provide a Kommo user account in the AI User step (Step 3). Once that’s done, the full list of channels will appear.
That’s it – your AI assistant is now live inside Kommo, ready to handle conversations without your team lifting a finger. If you run into any issues, reach out to our support team and we’ll get you sorted out.